A rotation slot is a capture priority, not guaranteed ownership.
Season 1 proposal
Season 1 city rotation proposal
The five-week order can still provide fair access to the three premium growth cities, but Season 1 does not support an automatic transfer. Each slot is a protected priority to capture when the route, protection timer and capture window make the handover legal.
☣️A rotation slot is a capture priority, not guaranteed ownership.
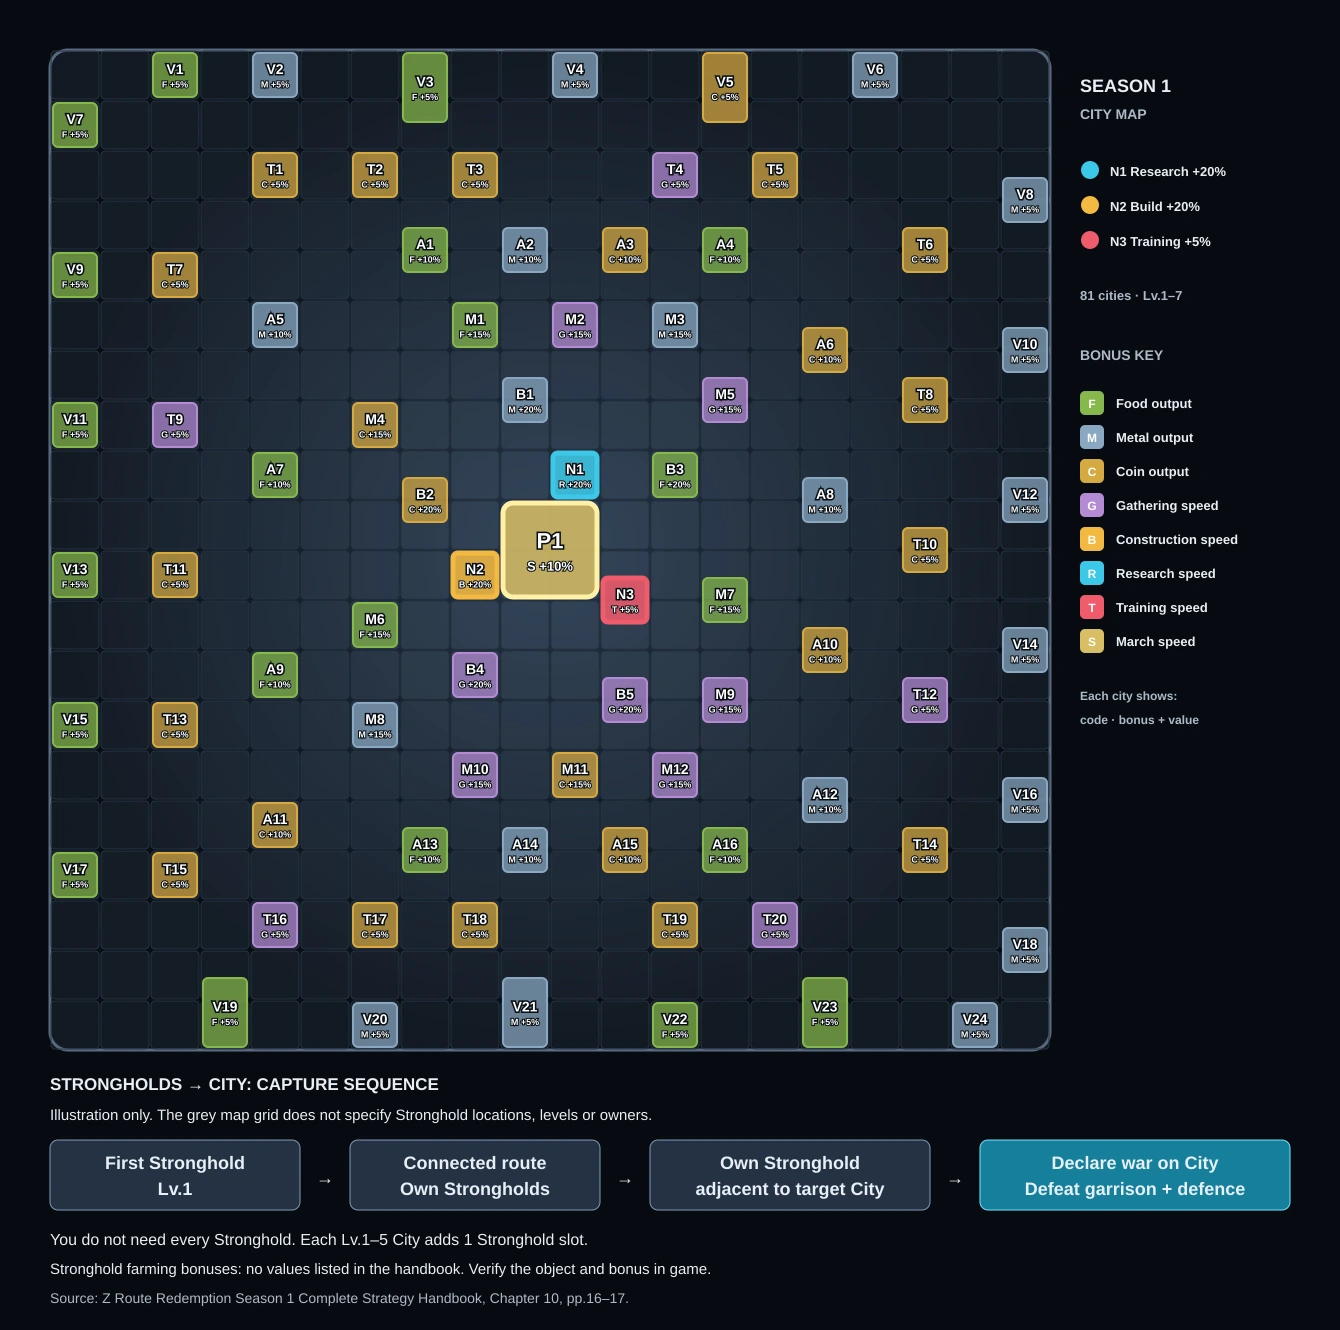
N1🔬 Research speed +20%N2🏗️ Construction speed +20%N3⚔️ Training speed +5%
🏰
Strongholds: the route to a City
You do not need to capture every Stronghold. To declare war on a City, your Alliance must own at least one adjacent Military Stronghold on its connected route.
🏰Start with a Level 1 Military Stronghold to establish the Alliance’s first territory.
🏰Capture further Strongholds along a connected route towards the target City. Check that the adjacent Stronghold belongs to the Alliance that will capture the City.
🏙️When the City becomes available, declare war, defeat the Neutral City Garrison NPC squads and destroy City Defence. Secure the City and protect the route.
Each captured Level 1–5 City adds 1 slot to the Alliance’s Military Stronghold limit. Expand through useful Cities and Strongholds; abandon obsolete Strongholds only when they no longer support the active route.
Outposts are separate Raid the Radiated Zone objectives. Their capture does not automatically provide the Stronghold connection needed to declare war on a City.
Resource bonuses: the handbook mentions Outpost bonuses and the Alliance City List, but gives no table of Military Stronghold farming bonuses or their exact locations. Check the object’s type and resource bonus in the game; no unverified percentages are assigned to the grey grid.
For rotation, plan each receiving Alliance’s access to its assigned City in advance. An adjacent Stronghold owned by the previous holder or a friendly Alliance does not satisfy the ownership requirement. Agree on routes and key Strongholds alongside the City schedule; keep the supporting route intact.
F 🌾 Food outputM 🔩 Metal outputC 🪙 Coin outputG ⛏️ Gathering speedB 🏗️ Construction speedR 🔬 Research speedT ⚔️ Training speedS 🚚 March speed
The grey grid is schematic: it does not show verified Stronghold positions, levels, owners or a ready-to-use route. Check actual adjacency, ownership and protection timers in the game before any capture or handover.
The proposal makes sense if the weekly table decides who has first claim when a city becomes available. It should never require an alliance to break a connected route, abandon protected territory early or fight merely to satisfy the calendar.
🛡️≈ 7 daysApproximate City protection after capture
🔗RequiredOwned adjacent Military Stronghold before declaring
⏳1 hourAbandonment time, one objective at a time
🏰36 hoursMilitary Stronghold protection after capture
Foreign-server operations add further limits: Wednesday and Saturday capture days, at most two Strongholds captured per day, three initial Stronghold slots per foreign server, and four Cities held across all foreign servers. These foreign-server limits should not be presented as home-map rules. Warzone Influence is also snapshotted at 00:00 on Thursday of Season Week 4 for matchup placement, so no handover should cross that checkpoint without a separate server decision.
N1 + N2
Top 10: rotate N1 and N2 as one package
One alliance in the weekly pair has first claim on N1 and the other has first claim on N2, so each receives one premium city. Publish the assignment before the capture window and reverse N1/N2 priority for that pair in the next cycle.
Week 1#1 + #2
Week 2#3 + #4
Week 3#5 + #6
Week 4#7 + #8
Week 5#9 + #10
N3
Ranks 11–15: rotate N3
One alliance per week has first claim on N3. A turn counts only when the alliance can legally capture it; a blocked turn is rescheduled instead of forcing a disconnected or wasteful attack.
Week 1#11
Week 2#12
Week 3#13
Week 4#14
Week 5#15
🛡️
Safe Season 1 handover
Check the City's live protection expiry and choose the next legal capture window; do not use a fixed clock without checking the timer.
Confirm each incoming alliance owns a connected Military Stronghold adjacent to its assigned City before anything is released.
Publish which member of the Top 10 pair has N1 priority and which has N2 priority; publish the N3 alliance separately.
If abandonment is required, start the one-hour process early and handle only one City or Stronghold at a time; verify the new owner, bonus and route after capture.
If protection, adjacency, capacity or player availability blocks the handover, keep the current owner as caretaker and reschedule the missed slot. Never release the supporting Stronghold first. Palace P1 remains outside this rotation.
🎯
Fair priority without unsafe transfers
This revised offer keeps the five-week fairness model while treating protection timers, connected Strongholds and live capture windows as hard gates. The calendar guides ownership; it does not override the game.


 Русский
 Español
 Português
 Українська
 Polski
 Türkçe
 Română
 اردو
اردو
 Italiano